.png)
“How to” RKE for different cloud providers
As of today, we have deployed and tested in 9 different cloud providers, 7 of them using the RKE autoscaler. Keep in mind we are NOT using any cloud provider Kubernetes engine, so no EKS, AKS or anything here. We are just deploying instances in each provider and connecting them via RKE. Usually, the process is streamlined to this:
1) Create an API token in the cloud provider
2) Create a Cloud credential token in Rancher
3) Create a Node Template in Rancher
4) Create the cluster using the Node Template
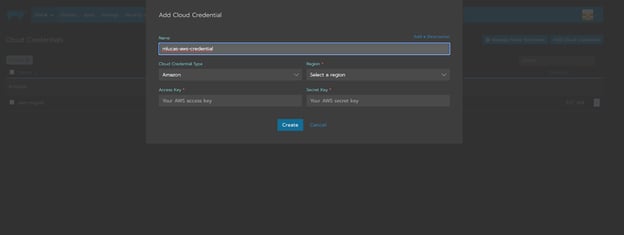
Adding a Cloud credential in Rancher
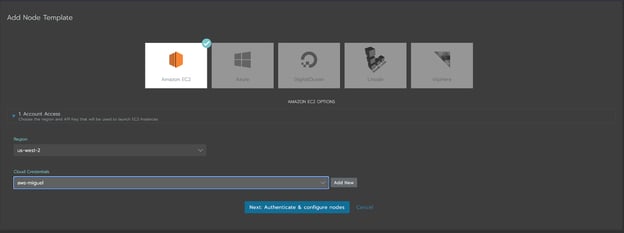
Creating a new node template in Rancher
Also, you have to take something into account: some providers are more restrictive than others concerning the traffic they allow, so it is possible that you need to redefine your firewall rules to allow specific IPs/ports. When Rancher access is restricted by the cloud provider, what we usually see is that the new instances are created but they aren’t correctly registered in Rancher, eventually timing out and starting the scaling process all over again. If this happens, check your firewall! You can check which exact rules you need in the Rancher Docs.
But hey, you know what? Let’s go step by step on the process for each one of the providers we’ve tested so far. Here’s how we’ve done it for each of them:
AWS
Let’s begin with AWS, shall we? This was our first cloud provider used, and where our journey with Kubernetes began!
For AWS in RKE we need to get an API Access Token from AWS and configure the cloud credentials, node templates and cluster in Rancher.
1) Generate an API Access Token in AWS.
a. Login to your AWS account and go to your username -> My Security Credentials.
b. Under "Access keys for CLI, SDK, & API access", click "Create Access Key".
c. Save the Access Key and Secret Key, you won't be able to see it again.
2) Insert your cloud credentials from AWS in Rancher.
a. Go to your Rancher profile (button in the top right corner) -> Cloud Credentials -≥ Add Cloud Credential.
b. Give a name to your credentials, choose Amazon and enter your Access and Secret keys.
3) Create a node template for AWS. (NOTE: you can create different node templates for the same cluster. For example, we use 2 node templates, one for the control plane nodes, and other for the worker nodes, with the latter being AWS spot instances).
a. Go to your Rancher profile (button in the top right corner) -> Node Templates -≥ Add Template.
b. Choose Amazon EC2, then choose the region you want to deploy your cluster and the credentials you created in step 2, and hit Next.
c. Select the Availability Zone and subnet you want.
d. For the Security Group, you can either create one here through Rancher, or create one in AWS and select it here. Don’t forget to check the required ports needed for Rancher nodes!
e. Enter your desired settings, like the instance type, disk size or the AMI.
4) We have everything prepared, so let’s create our first cluster!
a. Go to Clusters -> Add Cluster and choose Amazon EC2 under “With RKE and new nodes in an infrastructure provider”
b. Enter your cluster name and add at least 2 node pools: one for the control-plane nodes and other for the worker nodes. For the sake of simplicity, we’ll keep going with this minimum scenario.
c. On the control plane node pool, check the etc and control plane boxes, and for the worker node pool check the “Drain before delete” and worker boxes.
d. Select your desired Kubernetes version and Network Provider.
e. Select "Amazon (In-Tree)" as your cloud provider.
f. (Optional) Check any Advanced Configurations you need for your cluster.
5) That’s it! You just need to wait a few minutes for the instances to be launched. Then follow the previous section on how to enable the RKE autoscaler, and you have your own RKE cluster with autoscaling!
Azure
Azure is also one of the in-tree cloud providers for Kubernetes, and already has a node driver embedded in Rancher, so no installation steps are necessary here. You can use the Azure CLI to get the necessary configurations for creating a RKE cluster here. Let’s jump :
1) Login in Azure CLI with az login.
2) You will need your subscription id. You can get this in the Azure Portal, or through az account list --output table.
3) Now run az ad sp create-for-rbac --name="<YOUR-CREDENTIALS-NAME>" --role="Contributor" --scopes="/subscriptions/<YOUR-SUBSCRIPTION-ID>" --output json for registering your new app where <YOUR-CREDENTIALS-NAME> is the name you want for your app and <YOUR-SUBSCRIPTION-ID> is the id you got in step 2. Save the json output for later.
4) Open up Rancher, go to your Rancher Profile -> Cloud Credential -> Add Cloud Credential.
a. Choose a name for your credentials, choose Azure from the list of options, and enter the subscription id from step 2, and the client id and secret from step 3.
5) Create a new node template for Rancher. Go to your Rancher profile -> Node Templates -> Add Template.
a. Choose Azure, then the credentials you created in step 4.
b. Here, enter the specific configurations you want for your deployment, like the Region, resource group, subnet, vnet, ports or machine size.
6) Finally, let’s create the cluster!|
a. Go to Clusters -> Add Cluster and choose Azure under “With RKE and new nodes in an infrastructure provider”.
b. Enter your cluster name and add at least 2 node pools: one for the control-plane nodes and other for the worker nodes. For the sake of simplicity, we’ll keep going with this minimum scenario.
c. On the control plane node pool, check the etcd and control plane boxes, and for the worker node pool check the “Drain before delete” and worker boxes.
d. Select your desired Kubernetes version and Network Provider.
e. Select "Azure (In-Tree)" as your cloud provider.
f. Enter the first 4 parameters with the data you've obtained from step 3 (aadClientId, aadClientSecret, subscriptionId, tenantId). You can also fill here more Azure specific configuration details if you need.
g. (Optional) Check any Advanced Configurations you need for your cluster.
7) And the cluster is now being created! Check the section on how to enable the RKE autoscaler now!
Digital Ocean
I present to you our first out-of-tree cloud provider, Digital Ocean! In fact, you can read more about our partnership with Digital Ocean right here, where our CTO explains why they are a solution for us! But getting to the point, here’s how to deploy a RKE cluster in Digital Ocean:
For Digital Ocean in RKE we need to get an API Access Token from Digital Ocean and configure the cloud credentials, node template and cluster in Rancher.
1) Generate an API Access Token in Digital Ocean.
a. Login to your Digital Ocean account and in the left side menu, go to API -> Generate New Token.
b. Give it a name, be sure that both "Read" and "Write" boxes are checked and create it. Copy the token that appears and save it, you won't be able to see it again.
2) Insert your cloud credentials from Digital Ocean in Rancher.
a. Go to your Rancher profile -> Cloud Credentials -≥ Add Cloud Credential.
b. Give a name to your credentials, choose Digital Ocean and enter your API token.
3) Create a node template for Digital Ocean.
a. Go to your Rancher profile -> Node Templates -≥ Add Template.
b. Choose Digital Ocean, then choose the credentials you created in step 2, and hit Next.
c. Choose the region and instance type you want. Unfortunately, as of now, Digital Ocean machines are not very distinguishable in this list. However, we found that the order the machines are displayed in Rancher follows the same order they appear in Digital Ocean’s UI.
d. Change every other detail you find useful for your use case.
e. Give it a name and create it.
4) Cluster creation time!
a. Go to Clusters -> Add Cluster and choose Digital Ocean under “With RKE and new nodes in an infrastructure provider”.
b. Enter your cluster name and add at least 2 node pools: one for the control-plane nodes and other for the worker nodes. For the sake of simplicity, we’ll keep going with this minimum scenario.
c. On the control plane node pool, check the etcd and control plane boxes, and for the worker node pool check the “Drain before delete” and worker boxes.
d. Select your desired Kubernetes version and Network Provider.
e. Since Digital Ocean is not a Kubernetes In-tree provider, select "External (Out-of-Tree)" as your cloud provider.
f.(Optional) Check any Advanced Configurations you need for your cluster.
5) Now go Bolina in your Digital Ocean! ![]()
Note: In all out-of-tree providers, an additional step is needed to configure your cluster, unrelated to RKE or the cluster autoscaler. You need to configure and install the cloud provider’s Cloud Controller Manager (CCM) which is usually available in github. Here is the one for Digital Ocean.
Linode
Linode is another out-of-tree cloud provider where we deploy our code (I admit, this rhyme was a bit forced…). For enabling a RKE cluster we need to get an API Access Token from Linode and configure the cloud credentials, node template and cluster in Rancher. In this case, Linode is a case where its node driver already comes bundled with Rancher!
1) Generate an API Access Token in Linode.
a. Login to your Linode account and go to your profile -> API Tokens -> Create a Personal Access Token.
b. Give it a name and set the expiry period.
c. Select "Read/Write" to "Select All".
d. Create token and save the token that pops up, you won't be able to see it again.
2) Activate the Linode node driver in Rancher.
a. In Rancher's top menu, go to Tools -> Drivers.
b. Change the separator to "Node Drivers".
c. Select Linode and hit Activate.
3) Insert your cloud credentials from Linode in Rancher.
a. Go to your Rancher profile -> Cloud Credentials -≥ Add Cloud Credential.
b. Give a name to your credentials, choose Linode and enter your API token.
4) Create a node template for Linode.
a. Go to your Rancher profile -> Node Templates -≥ Add Template.
b. Choose Linode, then choose the credentials you created in step 3, and hit Next.
c. Choose the region, image,instance type and every other detail you want.
d. Give it a name and create it.
5) Create a new cluster in your Rancher server!
a. Go to Clusters -> Add Cluster and choose Linode under “With RKE and new nodes in an infrastructure provider”.
b. Enter your cluster name and add at least 2 node pools: one for the control-plane nodes and other for the worker nodes. For the sake of simplicity, we’ll keep going with this minimum scenario.
c. On the control plane node pool, check the etcd and control plane boxes, and for the worker node pool check the “Drain before delete” and worker boxes.
d. Select your desired Kubernetes version and Network Provider.
e. Since Linode is not a Kubernetes In-tree provider, select "External (Out-of-Tree)" as your cloud provider.
f. (Optional) Check any Advanced Configurations you need for your cluster!
6) Linode your way from here on!
Now you just need to enable the Linode CCM and the RKE cluster autoscaler!
OVH
Oui, Codavel CDN va arriver en France aussi, à travers du Rancher! Super! 🥐 OVH is one of the providers that do not come bundled with Rancher, so we need to import a custom Node Driver. We’ve used the one published here.
1) In Rancher’s top menu, go to Tools -> Node Drivers, then open the Node Drivers separator.2) Click on Add Node Driver and in the Download URL field, place https://github.com/yadutaf/docker-machine-driver-ovh/releases/download/v1.1.0-1/docker-machine-driver-ovh-v1.1.0-1-linux-amd64.tar.gz (NOTE: please see the link above before importing and check for any newer release). Create the driver and wait a few seconds for it to activate.
3) Go to your Rancher profile -> Node Templates -> Add Node Template.
a. Choose OVH and enter your credentials.
b. Change any default option you need, such as region, flavor or image for the instances.
4) All that’s left is to create the cluster!
a. Go to Clusters -> Add Cluster and choose OVH under “With RKE and new nodes in an infrastructure provider”.
b. Enter your cluster name and add at least 2 node pools: one for the control-plane nodes and other for the worker nodes. For the sake of simplicity, we’ll keep going with this minimum scenario.
c. On the control plane node pool, check the etcd and control plane boxes, and for the worker node pool check the “Drain before delete” and worker boxes.
d. Select your desired Kubernetes version and Network Provider.
e. Since OVH is not a Kubernetes In-tree provider, select "External (Out-of-Tree)" as your cloud provider.
f. (Optional) Check any Advanced Configurations you need for your cluster.
5) Another cluster successfully created! Wasn’t that easy?
Just don’t forget to enable the OVH CCM and the RKE cluster autoscaler!
Oracle Cloud
Ah Oracle. You know that saying that goes “every rule has an exception”? Well, Oracle is one of the exceptions. While there is a public node driver available to integrate in Rancher, when we tested it…it didn’t work out. After some investigating, we saw that the nodes created in Rancher stayed waiting forever for the instances to boot up in Oracle, even after the instances were declared as ready. We discovered that the node driver introduced a prefix to every instance created, and Rancher couldn’t detect it in this way, as it searched for the instance name without the prefix. We needed to fork the Oracle Node Driver and make just a slight change to eliminate this prefix and everything worked ok since that change. We haven’t yet made a pull request as we have other internal changes, but in case you need it, in the oci.go file, change the following:
#change this
defaultNodeNamePfx = "oci-node-driver-"

#to this
defaultNodeNamePfx = ""
After this, follow the repository instructions on how to build a new release and save the URL, you will need it later.
Now, I’m going to assume that you already have everything setup in Oracle, such as your compartments, subnets, or VCNs. To deploy an OCI cluster with RKE, we first need to generate a key pair to use in their Oracle instances. Let’s get to it:
1) Generate a key pair to use in Oracle instances. Follow their official guide for this. You will need to upload the public key to Oracle and use the private key in Rancher.
2) Create a new API Key in Oracle and copy its contents.
a. Login to your Oracle Cloud account and in the top menu go to your Profile picture and click on your profile name.
b. In the left side menu, under Resources, go to API Keys.
c. Click "Add API Key" and select "Choose Public Key File". Drop the public key file that was generated in step 1.
d. Copy and save the user, fingerprint, tenancy, and region.
3) Rancher already has the OCI node driver available on the fly. However, we need to import the one you built.
4) Insert your cloud credentials from OCI.
a. Go to your Rancher profile -> Cloud Credentials -≥ Add Cloud Credential.
b. Put "oracle-credentials" as the name, choose OCI, and enter your account credentials and the private key generated in step 1.
5) Create a node template for OCI.
a. Go to your Rancher profile -> Node Templates -≥ Add Template.
b. Choose Oracle Cloud Infrastructure and select the Cloud Credentials you created in step 4.
c. Enter the details you need for your deployment, such as region, compartment OCID, Image, Shape, VCN, etc…
d. Give it a name and hit Create.
6) Create a new cluster in your Rancher server.
a. Go to Clusters -> Add Cluster and choose "Oracle Cloud Infrastructure" under “With RKE and new nodes in an infrastructure provider”.
b. Enter your cluster name and add at least 2 node pools: one for the control-plane nodes and other for the worker nodes. For the sake of simplicity, we’ll keep going with this minimum scenario.
c. On the control plane node pool, check the etcd and control plane boxes, and for the worker node pool check the “Drain before delete” and worker boxes.
d. Select your desired Kubernetes version and Network Provider.
e. Since Oracle is not a Kubernetes In-tree provider, select "External (Out-of-Tree)" as your cloud provider.
f. (Optional) Check any Advanced Configurations you need for your cluster.
7) And that’s it! You have your own OCI cluster with RKE enabled!
Don’t forget to enable the OCI cloud controller manager!
Equinix Metal
And for my last trick… I bring you Equinix Metal! ![]() As of now, Equinix is the bare-metal provider we use. Fortunately, that makes no difference when it comes to deploying our services using Rancher and RKE!
As of now, Equinix is the bare-metal provider we use. Fortunately, that makes no difference when it comes to deploying our services using Rancher and RKE!
For Equinix in RKE we need to fetch an API Key and Project ID, import the Equinix Node Driver, configure the node templates and launch a cluster in Rancher. Let’s get started:
1) Generate an API Key in Equinix.a. Login to your Equinix account.
b. Go to your username -> Personal API Keys.
c. Click "Add New Key".
d. Fill in a description for your key and click “Add”.
2) Import the Equinix Metal Node Driver.
a. In Rancher’s top menu, go to Tools -> Node Drivers, then open the Node Drivers separator.
b. Click on Add Node Driver and in the Download URL field, place https://github.com/equinix/docker-machine-driver-metal/releases/download/v0.4.0/docker-machine-driver-metal_linux-amd64.zip (NOTE: please see the link above before importing and check for any newer release). Create the driver and wait a few seconds for it to activate.
3) Go to your Rancher profile (button in the top right corner) -> Node Templates -≥ Add Template.
a. Choose Metal.
b. In the field "apiKey" paste your API Key of Equinix. In the field "projectId" paste your Equinix's project id. You can find it under Equinix Metal -> Project Settings.
c. In the field "facilityCode" insert the code of the Equinix region where you want to deploy your cluster. Here is a list of all available Equinix regions and its codes.
d. Add any additional setting you want, like the os or the plan.
4) Let’s create the final cluster!
a. Go to Clusters -> Add Cluster and choose Metal under “With RKE and new nodes in an infrastructure provider”.
b. Enter your cluster name and add at least 2 node pools: one for the control-plane nodes and other for the worker nodes. For the sake of simplicity, we’ll keep going with this minimum scenario.
c. On the control plane node pool, check the etcd and control plane boxes, and for the worker node pool check the “Drain before delete” and worker boxes.
d. Select your desired Kubernetes version and Network Provider.
e. Since Equinix Metal is not a Kubernetes In-tree provider, select "External (Out-of-Tree)" as your cloud provider.
f. (Optional) Check any Advanced Configurations you need for your cluster.
5) Uff! 7 clusters created!
More providers? Let them come!
I'm not sponsored by Rancher, but I hope I’ve convinced you to give it a shot if you are a Kubernetes user. We’ve seen how to install the cluster autoscaler in 7 different providers (more are coming later!), but what about if a new cloud provider arises? Yes, this happens at Codavel and we need to take advantage of every PoP we can to have as much global presence as possible. I swear, I think that someday our CTO will come to my Monday morning meeting and say “Hey Miguel! I found a new cloud provider on Mars!”, and somehow we have to make it work. So, let’s count our options here.
Let’s assume this new cloud provider CloudX has no implementation for either the official Kubernetes cluster autoscaler nor a Rancher node driver. Let’s also assume CloudX has a public API to access all or most of their features. If we opt to develop a new interface for the cluster autoscaler, we need to directly use their cloudprovider interface to implement our CloudX provider. Actually, if you want to know exactly what you have to do for your own implementation, here’s a great post guiding you on the steps needed. Then, we have to adapt our cluster autoscaler yaml files and hopefully all will work.
Now let’s do another approach and instead of a cluster autoscaler implementation, let’s develop a new Rancher node driver. Here’s some additional information on how to do it. For this, 2 components need to be developed, the docker-machine driver and ui-driver for integration with Rancher’s UI. I admit that the development effort may be slightly superior with this approach due to the UI component, but the complexity of both these drivers is not very high. Personally, I’d say that the effort of creating the Node driver is smaller, due to the somewhat high complexity of the cluster autoscaler project, but I know this could be a hot debate. :)
So, why would you choose the Rancher Node Driver approach?
- Only one implementation of the cluster autoscaler
- Instead of having to manage multiple implementations for different providers, we have just one single implementation of the autoscaler. If it works with one provider, it will most likely work with other providers. This is a major advantage over the first approach, as you’d need to maintain different implementations and different yaml configurations for each provider.
- Rancher Node Drivers are not prone to many updates, unless the cloud provider API changes, or Rancher launches a breaking change. Most of these projects reach their end phase relatively soon.
- Rancher community is very open to contribute and help. We’ve used their Slack channel several times and received some very interesting answers!
Wrapping up
We’ve seen why we’ve used RKE to easily expand to different cloud providers, optimizing the relation between the PoPs we can provide and our financial costs. Additionally, we’ve seen how to install RKE in different providers and how to expand to even more! Feel free to message me for any tips or comments about it!

.png)