TLDR: Auto scaling a cluster is a major challenge, solved at Codavel using Rancher’s RKE. This provided us with a way to uniformize our auto scaling feature in all our cloud providers.
At Codavel, we don’t own infrastructure which leads to the need to interact with different cloud providers so we can maximize our PoPs and our global presence. Migrating to a Kubernetes solution was the first major step we took towards this goal, but we encountered some bumps along the way. One of the most challenging ones was how to automatically scale our number of instances whenever our clusters grow. Having to get someone to constantly monitor all our clusters and manually scale the number of nodes is just unfeasible. We quickly discovered the cluster autoscaler project and implemented it, but also quickly discovered that it wasn’t the right fit for us.
- We wanted to leverage multiple cloud providers, and many have their own Kubernetes engine (AWS’ EKS, Azure’s AKS, Linode’s LKE…). Using the providers own engines would actually be simpler from a development point of view, but would also lead us into additional costs. Also, there are providers that do not have their own Kubernetes engine (Equinix, OneProvider, Kamatera…).
- The cluster autoscaler project worked fine in our first tests in AWS, but when we tried to deploy it in our second cloud provider, we realized that we needed a completely different setup for it. The way we deployed in AWS was not the same way we deployed in Digital Ocean. Actually, let me rephrase that. It could not be the same. AWS does auto scaling through their Auto-scaling groups feature, which is a concept that is done differently or does not exist at all in other providers. As such, we couldn’t use the exact same setup on two different providers
- Yes, we’ve created internal documentation on how to deploy in our first 3 providers, but following a 300 lines README file, not only is incredibly boring, is also very prone to human error. At least it was better than our 27 page deployment guide prior to Kubernetes!
Dear reader, I introduce to you my lover, Rancher. If you’ve read our previous blogpost, you already know why we use it and it’s many advantages. Rancher has its own Kubernetes engine, aptly named RKE (duh!) which greatly simplifies the installation and management of a Kubernetes cluster in any kind of machines, both virtual and bare metal. If I can run Docker on my machine, most likely I will be able to run RKE. Having to manage multiple cloud providers and their own Kubernetes engines would be incredibly challenging, and we give thanks every day for the creation of RKE (thank you Rancher people!).
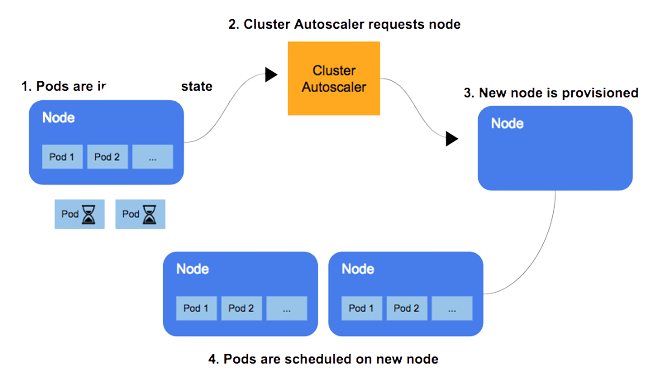
But the challenge doesn’t end there! One of the challenges of building up a Kubernetes cluster is the cluster auto-scaling component. I won’t go into much detail about how this process works (here’s a great article about that) but basically, it means that when pods are created and have nowhere to be allocated, either because of memory constraints, anti-affinity rules, etc, they stay in a “Pending state”. The cluster autoscaler detects these pending pods and requests the cloud provider to create a new node, which then joins the cluster when it is ready. The pods can then be allocated to the new node.
If you check out the cluster autoscaler repository, you can see they already have integrations with many cloud providers (many of them were added after we began working with it, nice progress!). So, what’s the problem, you are asking now? I can just grab the implementation for the provider I want and voilà. Well…yes and no.
Our cluster is based on maximum flexibility. We want to deploy the exact same cluster using the exact same approach with minimal changes on every provider. Our first option was what you are thinking right now. We got the cluster autoscaler implementation for the providers we wanted, and then wrapped a script that would fetch any cloud provider specific information from a local json file (credentials, network settings, deployment zones…) and according to the cloud provider we specified in that json, it would call the respective cluster autoscaler. This works like a charm. But we weren’t content with it.
There are 2 major problems with this:
- What about cloud providers that do not yet have an implementation of the cluster autoscaler? There are many providers we want to test out, and about half of them do not support this. We can’t be limited by the unavailability of this implementation.
- Adding a new cloud provider requires some effort for implementing the new cluster autoscaler, integrating it with our wrapper script and testing out everything went well. This can take days of development.
We want to grow, and we want to grow fast. If you like football (or soccer for the US audience), we have an internal motto that we are aiming for the champions league and we are about to enter the group stage. These 2 problems were stopping our growth, and we needed a solution for this.
Alas, behold the marvels of Rancher’s RKE!
As we’ve seen in a previous blogpost, we use Rancher as a tool to deploy and manage our clusters. While we could still use the method described above with Rancher, we discovered something else: Rancher’s own RKE cluster autoscaler! This was developed by the Ubisoft Kubernetes team, and while at the date it is not yet officially released in the cluster autoscaler project, they left a pull request for this to enter in a future release. I remember my reaction when I first saw this, it was like when a 14 year old me went to see Tokio Hotel playing for the first time: OMG OMG OMG!!! Don’t judge me! After I rode through the monsoon of feelings from that moment, I started to test it out and it was exactly what we needed: a one-size fits all solution! Rancher’s biggest advantage is being able to interact with different cloud providers, managing all clusters equally, whether they are deployed in AWS, Oracle, Linode, or any other cloud provider. The RKE cluster autoscaler takes advantage of this: instead of communicating directly with the cloud provider, we direct our communication to Rancher, which then redirects our requests to the cloud provider.
How exactly does this work? There is a key component for this, which is the Rancher Node Driver. This is the component that enables Rancher to interact with a specific cloud provider. So, if you have 13 different providers, you will need 13 different node drivers. This is nothing more than an interface that connects to the cloud provider’s API in order to request different operations like listing regions, machine types, subnets, and more importantly, creating and destroying instances. Here is the Rancher documentation about this component, if you want to know more about it. Some of these drivers already come bundled in when you install Rancher, some others you have to import them through the UI with a very simple process. Here is an example of some of the node drivers we are currently using.

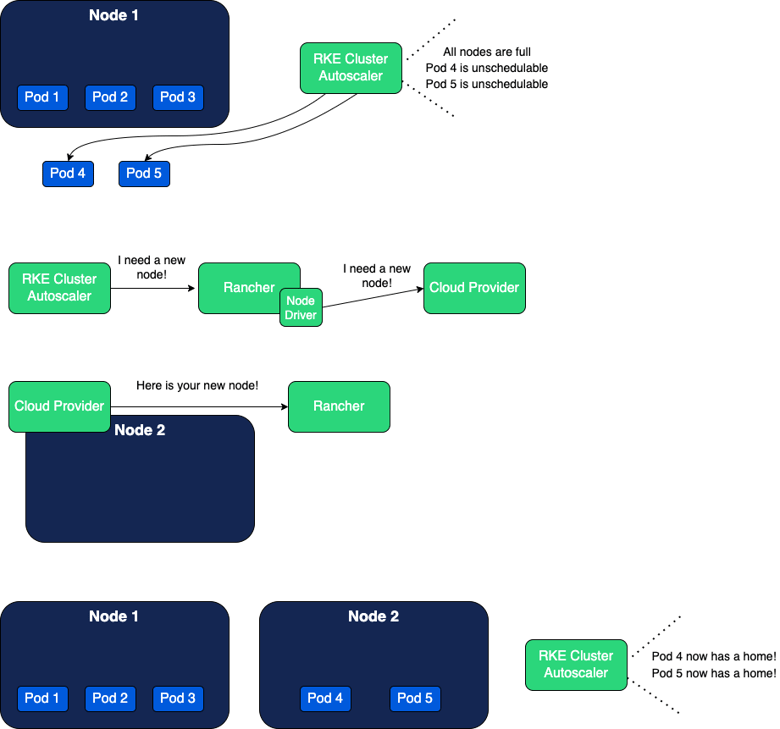
The flow is something like this:
- A new pod is created and becomes unschedulable.
- The RKE cluster autoscaler detects this pod and informs Rancher “Hey, I need a new node!”
- Rancher receives this request and, through the node driver used, requests the cloud provider to create a new instance.
- The cloud provider starts creating the instance (this can take a few minutes).
- Rancher stays listening to the cloud provider, to check when the instance is ready.
- When the instance is ready, Rancher joins it to the cluster.
- The unscheduled pods now have a home!
There is a downside to using the RKE cluster autoscaler vs native cluster autoscalers, which is the availability of the Rancher Node Driver, as some cloud providers do not (yet!) have it implemented. However, I dare to argue that it is much easier to develop a new Rancher node driver than an implementation of the cluster autoscaler to a new cloud provider. More on that to come next!
Ready, set, go, it's time to… Enable the RKE cluster autoscaler!
Ok, enough talk, let’s get dirty with how we get this to work. The first step for this is to actually build an image that you can import into your Kubernetes cluster. So clone the cluster autoscaler project, go to the cluster-autoscaler folder and compile the project with make build-in-docker . Then use Docker to build and upload an image to your own repository. I’m assuming you already have Golang configured, but please check the project build requirements as well.
Afterwards, we need to create a Kubernetes Secret with all necessary information about which nodes/pods should the autoscaler be looking out for. The rancher-autoscaler-secret-template.yaml looks something like this:
apiVersion: v1
apiVersion: v1
kind: Secret
metadata:
  name: cluster-autoscaler-cloud-config
  namespace: kube-system
type: Opaque
stringData:
  cloud-config: |-
    [Global]
    url="YOUR-RANCHER-URL"
    access="YOUR-RANCHER-ACCESS-TOKEN"
    secret="YOUR-RANCHER-ACCESS-SECRET"
    cluster-id="YOUR-RANCHER-CLUSTER-ID"
  autoscaler_node_arg: "MIN_NODES:MAX_NODES:RANCHER_NODEPOOL_ID"
To get your Rancher URL, access token and access secret, go to your Rancher Profile -> API & Keys -> Add Key. Give a name to your key, and hit Create. The new page shows the first 3 fields you need to fill for the Secret. For the Cluster id and Nodepool id, go to your Rancher Clusters page, select the cluster you want and go to the Nodes menu. Select the nodepool you want to scale (usually the worker nodes) and select “View in API”. It will show you an interactive json page, search for the id field, which will look something like this: c-h8b2h:np-rzc8z. This whole string is your nodepool id and your cluster id is the substring c-h8b2h. Choose your minimum and maximum nodes and you have all the information you need for the Secret.
Note: We currently use Rancher v2.5.11, but depending on your installed Rancher version, this process can be a bit different, as it uses a slightly different UI.
Now, you just need to create the cluster autoscaler deployment! For this, create a rancher-autoscaler.yaml with this content. Props to you again Ubisoft! Don’t forget to change the image used to the one you built at the beginning of this section.
containers:
   - name: cluster-autoscaler
     image: "YOUR-IMAGE-GOES_HERE"
And there you have it. Your autoscaler will now (theoretically) work with every single cloud provider as long as you have a functioning Rancher Node Driver to that provider. It was not that hard, was it?
There’s only one thing missing now, which is to actually grab Rancher by the horns (heh) and see how we use it and configure it for multiple cloud providers. But for now, grab a coffee, relax, and stay tuned for part 2 of this blog post! Have you watered your plants?

.png)
.png)