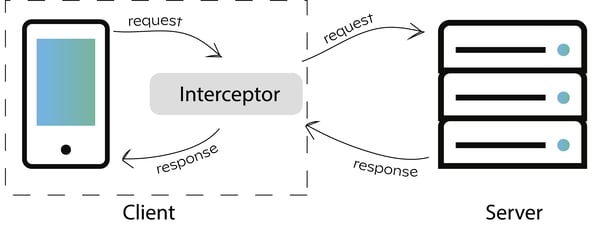
Before getting started on how to intercept HTTP requests on an iOS app, let me give you a brief catch up on what it is an HTTP interceptor. An interceptor is basically an entity who gets triggered every time the application makes an HTTP request. It is very useful when you need to perform some processing or to add a new header to each HTTP request. The image below shows how simple is the logic behind how an Interceptor work, while a client makes an HTTP request to a specific server or API.
In order to implement an HTTP requests interceptor you just need to create your own Protocol, based on the Foundation Framework, the NSURLProtocol. Before you go any deeper, I highly recommend taking a look at the Apple Developer Documentation. There you can learn the basics and get detailed information about all the classes, objects and required methods during the implementation process.
I started by creating a simple iOS application, which is pretty much a generic Objective-C App that makes a simple GET request to the postman-echo.
This project has two implementation phases:
- Implementing the Protocol,
- Implementing the HTTP request.
Implementing the Protocol
First of all, why do you need to implement a Protocol? To intercept any request we need an entity or a class that helps us handle the loading of protocol-specific URL data. The Apple Foundation Framework provides the NSURLProtocol abstract class which our interceptor will extend. You need to implement several NSURLProtocol abstract methods in order to make sure that the request flow works properly. The first one is the canInitWithRequest and as you can see by the image below, I just want to intercept all the HTTPS requests.
After validating the URL request, the next step is to add the canonicalRequestForRequest abstract method. This ensures that the protocol classes guarantees that the same input request always yields the same canonical form.
The next abstract method is the startLoading. It is called every time a request is made and starts loading the request. As you can see below, this is the right place to add a specific header to be sent to the server. Notice that I simply make a mutable copy of the original request before adding the new header and then set the Protocol connection by updating the previously changed request.
The last NSURLProtocol abstract method it’s the stopLoading, and simply stops loading the current request by calling the connection cancel method.
Now that all the NSURLProtocol methods were implemented, the next step it is to add an interface to allow your protocol to intercept all the HTTP requests, and the option fell on the NSURLConnection object. So we start by adding a new connection object:
As you might know, the NSURLConnection class works with three formal protocols, the NSURLConnectionDelegate, NSURLConnectionDataDelegate and NSURLConnectionDownloadDelegate, but for this example I just need the DataDelegate. The DataDelegate protocol provides methods that should be implemented by the delegate for our NSURLConnection instance.
So, despite NSURLConnectionDelegate providing several methods, I will just implement the most basic one considering my scenario, for the interceptor purpose.
The first one is the willSendRequest method, and it is going to be used to notify the Interceptor that the request will be sent to the server. In my case I just print the request headers, to ensure that the request, which has previously changed, has the added header.
After sending the request, the server will receive it and send a response to the Interceptor. So, by implementing the didReceiveResponse method, the interceptor will be notified with a response and redirects the response to the client. Usually, this method is used for status code validation, as shown in the example below.
After the Interceptor receives the response from the server, it will also receive the response data. This is important because that response data needs to be redirected to the client. The method is call didReceiveData and for debug purposes I simply print the response and redirect it to the client.
The final method is the connectionDidFinishLoading and it is called when all the request procedure has finished. Here I just send that information to the client, to notify him that his request is finished.
Besides these four methods, I highly recommend another one: the didFailWithError method. This is a very useful method, in case of having any error through the request operation, and I use it to notify the client when an error occurs.
Before finishing the interceptor implementation there is one more thing that needs to be done. While trying to change the request by adding a new HTTP header, I noticed that the NSURLProtocol provides a request object that is immutable, so it can’t be changed. My approach was to make a mutable copy of the request but, when I launched the application, the Xcode gave me a leak memory error. After a web research, I have found out that it is a common bug when you call the NSURLRequest mutableCopy. This was my workaround solution:
Implementing the HTTP request
With our Protocol completely implemented, the final step is to start using it on our App. Just create a new default Session Configuration and then add the Protocol to the existing Session protocols.
Finally, the last piece of the puzzle is the request itself, that is pretty much a simple GET request for the Postman Echo.
As you can see, it is easy to intercept any request in a simple iOS app. I decided to use the NSURLConnection because that was the URL Loading System that I feel most comfortable to work with, but you can use NSURLSession. It is more robust and will help you handling the request by using a session configuration, instead of using all the delegate logic.