Recently, I revisited the history of TLS and the major benefits and vulnerabilities of its latest iteration, TLS 1.3. But seeing is believing so, in this post, I will show how you can build a server setup with TLS 1.3 support and give some tips on how to evaluate the benefits of the most disruptive feature of TLS 1.3: 0-RTT handshake.
0-RTT handshake: why does it matter?
Even though we like to think the Internet provides immediate access to tons of information with a single interaction the show is quite different on the backstage. Every request must travel between our device and the multiple servers hosting the content we want to reach. However, this content server can be deployed anywhere in the world.
I know, I am being too simplistic when describing how the Internet works. Services can make use of multiple host locations and can make use of CDNs, all with the goal to be as close as possible to the end-user. However, this does not completely solve the issue... In fact, network engineers do not even care about the distance itself. They actually care about the time it takes to overcome that distance - the much-talked-about latency. Why? Because, even though the distance between the peers affects the time is time to data to be transmitted, the way the users accesses the Internet can have a huge impact on the measured latency.
For instance, for the same server, users connected to a wired gateway with fiber access will have lower latency than users connected to the same gateway with fiber via Wi-Fi. Users connected via a gateway with ADSL will experience higher latency. But it can be even worse. Cellular networks are notoriously known for their high latency. And satellite… We need to change from milliseconds to seconds to measure it more accurately.
As a general rule, the latency of each access technology increases as follows:
Cable+Fiber < WiFi+Fiber < Cable+ADSL < WiFi+ADSL < 4G < 3G < 2G < Satellite
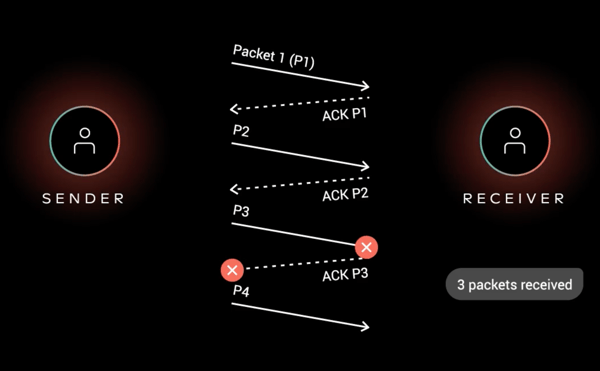
And even though you can have the best access technology, this does not mean the protocol you use to access the content won’t be your biggest bottleneck! In order to get content served to my device, the protocol needs to send a message to the server, get the response, then send another message to the server and get the response and then send another message to the server and finally get the content… (see example below!). This means that I need 2.5 round-trip-times (RTT) before the server actually sends me any content. That’s not very efficient, is it?
 So what does an efficient protocol do? An efficient protocol tries to minimize the number of round-trip-time (RTT) required in order to successfully establish a connection. And that is the goal of TLS 1.3 regarding performance, reduce the required RTTs.
Great, let’s build the necessary end-points
In order to fully utilize TLS 1.3, we need a client and a server that supports the protocol. On the client side, support for TLS 1.3 can be covered by Chrome or Firefox. However, if we want to enable the client to make use of 0-RTT of TLS 1.3, which we do, we need to use Firefox Nightly version, Firefox’s development version - and therefore, not yet ready for production. Well, that’s a bummer… From now on, we will use exclusively Firefox Nightly to assess the performance benefits of TLS 1.3.
Looking into the server-side support, things look fine for TLS 1.3 support. However, most lack support for the 0-RTT feature. Thankfully, my favorite web server, Nginx, fully supports TLS 1.3 with 0-RTT. Let’s get our hands dirty and install it. To install the Nginx server I am assuming that you:
- Have initiated a cloud instance, such as AWS EC2 or DigitalOcean Droplet and know its public IP address
- Runs Ubuntu 18.04
- Has Docker and Docker-Compose installed
- Accepts traffic on ports 80 and 443
- Have control of a domain
With these points covered, we are set to install and configure our server.
1. Assign a domain name
First things first, please assign a name (e.g. machine.domain.com) to your instance in your domain that points to the instance’s public IP address.
2. Get a domain certificate
To get a domain certificate for our machine, we will make use of LetsEncrypt Certbot.
Install Certbot into the system:
sudo add-apt-repository ppa:certbot/certbot
sudo apt update
sudo apt install certbot
Run Certbot to get a domain certificate:
sudo certbot certonly --standalone --preferred-challenges http --register-unsafely-without-email --agree-tos -d <machine.domain.com>
Now we have our certificate in:
/etc/letsencrypt/live/machine.domain.com/fullchain.pem
And our private key in:
/etc/letsencrypt/live/machine.domain.com/privkey.pem
Both files will be used on the web server and will allow it to use TLS 1.3.
Please make sure that you adapt the path and certbot command to your domain.
3. Clone the Nginx sample project
The Nginx sample project is available on Github with all the necessary configurations. Simply clone on the server instance:
git clone https://github.com/dferreira-cvl/docker-nginx-tls1.3.git
Make sure you are inside the cloned project:
cd docker-nginx-tls1.3
4. Set the Nginx environment
Even though we provide a sample project, we still need minor adjustments, namely, we need to copy the domain certificates that we already generated on point 2.
To copy the domain certificates, simply run the command:
sudo cp /etc/letsencrypt/live/machine.domain.com/* ./letsencrypt/.
5. Build the Docker-Compose application
To build the docker-compose application, simply run the command:
docker-compose up --build -d
If everything goes well, you should see the following output:
Starting docker-nginx-tls13_web_1 ... done
6. Check your web server connection
To check that everything is working, open Firefox Nightly and go to:
https://machine.domain.com
If everything goes well, you will be presented with a welcome page from Nginx.
Understand the Sample Project
Now that we have the setup up and running, it is time to understand how everything is organized.
The sample project contains 2 major files:
- docker-compose.yml
- Description of the docker image and its properties
- default.conf
- Nginx configuration file
And 2 major folders:
- content
- a place with the files to be served by the web server. It contains a simple index.html file and a image file (img.jpg)
- letsencrypt
- a place to store the domain certificate and its corresponding private key
Let’s focus on the default.conf file, giving that it is the most important file in the project. It allows you to control not only the web server configuration but also the behavior of TLS 1.3. The most important piece is:
server {
	listen 443 ssl;

	ssl_certificate /etc/letsencrypt/fullchain.pem;
	ssl_certificate_key /etc/letsencrypt/privkey.pem;
	ssl_protocols TLSv1.3;
	ssl_early_data on;

	keepalive_timeout 0;

	location / {
		root /usr/share/nginx/html;
		index index.html index.htm;
	}
}
Step by step.
listen 443 ssl;
Defines that we are listening to port 443 and are listening for HTTPS requests.
ssl_certificate /etc/letsencrypt/fullchain.pem;
ssl_certificate_key /etc/letsencrypt/privkey.pem;
Defines the location of the domain certificate and its corresponding private key, used to establish a TLS session. Notice that the path refers to the path inside the container, which is mapped to the folder inside the project in the docker-compose.yml file.
ssl_protocols TLSv1.3;
Defines the TLS version, in this case, only TLS 1.3 is supported.
ssl_early_data on;
Defines if the web server should allow TLS 1.3 0-RTT handshakes. We will play with this variable in order to enable and disable the 0-RTT handshake to better understand its benefits.
keepalive_timeout 0;
Forces the web server to immediately close the HTTP connection after serving the request. This is used to allow us to see the 0-RTT handshake benefits in action. Otherwise, the browser would just keep the connection opened, not allowing us to see the 0-RTT handshake working. Production deployments must remove this flag.
location / {
	root /usr/share/nginx/html;
	index index.html index.htm;
}
Defines the path of the files to be served by the web server.
And that’s all it takes to configure Nginx server TLS 1.3 connections.
TLS 1.3 Benefits in action
We will now see TLS 1.3 performance benefits in action. But first, change the variable ssl_early_data to off. This will make the server to not use 0-RTT, requiring every connection to establish a full connection. To enable this configuration, just run the commands:
docker-compose stop
docker-compose up --build -d
On Firefox Nightly open the Developer Window, in Tools -> Web Developer -> Toggle Tools. In most operating systems, it can also be opened by clicking the F12 key. Then go to Network tab and make sure that Disable cache toggle is turned on. Finally go to:
https://machine.domain.com
If no data is shown in the Developer Window, just refresh the page. Select the first file in the list, with 200 green status, and on the right select the Timings window. Out of all data shown, the one that we interested in is TLS setup, which refers to the TLS handshake time. And it should show data similar to this:

As we can see, this request took 117 ms to pass through the TLS handshake. Not bad, considering that a ping to the server takes some 112 ms, showing that TLS 1.3 is capable of establishing a connection in just 1-RTT. In total, the browser waited 333 ms to get the full HTML page.
Now let’s see 0-RTT in action. On the default.conf file inside the server project, change the variable ssl_early_data back to on and enable the changes this the commands:
docker-compose stop
docker-compose up --build -d
On the browser, refresh once. You will see the regular 1-RTT time, as previously. Refresh one more time and look to the TLS setup time. It should show something similar to this:

The browser shows a -1 value, meaning that it did not need to go through the full TLS handshake. In fact, the browser just sent its part of the TLS handshake with the request itself. The TLS 1.3 0-RTT feature allowed the browser the just wait 221 ms, instead of the previous 333 ms, to get the same webpage from the same server. A significant improvement!
Playing around with larger files, such as an image, we can see that, for the 1-RTT handshake:

While for the 0-RTT handshake:

Showing that, 1-RTT handshake took 3.5 seconds to get the image, while 0-RTT handshake took 3 seconds flat. Again, a win for the 0-RTT handshake as expected.
Let’s sum it up
TLS 1.3 0-RTT show actual benefits in real-world deployments. And it is relatively simple to fully deploy a service that makes full use of TLS 1.3 potentialities, with TLS 1.3 giving services, developers and end-users better security and improved performance, at the same cost as old TLS versions, such as TLS 1.2. However, as we discussed in my previous blog post, the industry needs to move fast to incorporate these new protocols. I am looking at you, Microsoft and Apple!
Moreover, even though TLS 1.3 support 0-RTT handshake, it is not really true 0-RTT. Look to the previous images, more precisely to the Connecting time. That is the time that the browser waits for the TCP 3-way handshake. A true 0-RTT handshake protocol, such as QUIC (a.k.a HTTP/3) makes use of UDP instead of TCP and therefore skips the time taken by the 3-way handshake.
More on network protocols, here.